Bath Chair for a Boy with TAR Syndrome
Robert Buechler, Aaron Carlson, Lenny Slutsky
Duke University
Durham, NC 27708
ABSTRACT
It is difficult for our client, an 8-year-old boy with Thrombocytopenia Absent Radius (TAR) Syndrome, to bathe independently because his arms are very short. To assist him, we built a bath chair using furniture grade PVC for the frame, HDPE for the seat, and mesh bath sponges as washing surfaces. A shower caddy was mounted to a safety railing on the right side of the chair, and shower heads were attached to the top of the chair and to a safety railing on the left side. The water flow for each shower head can be controlled by the client using two push-button valves on a diverter. Using the chair, the client can now bathe independently.
KEYWORDS
Bath Chair; TAR syndrome; Assistive device; Adjustable Shower Heads; PVC pipe
BACKGROUND
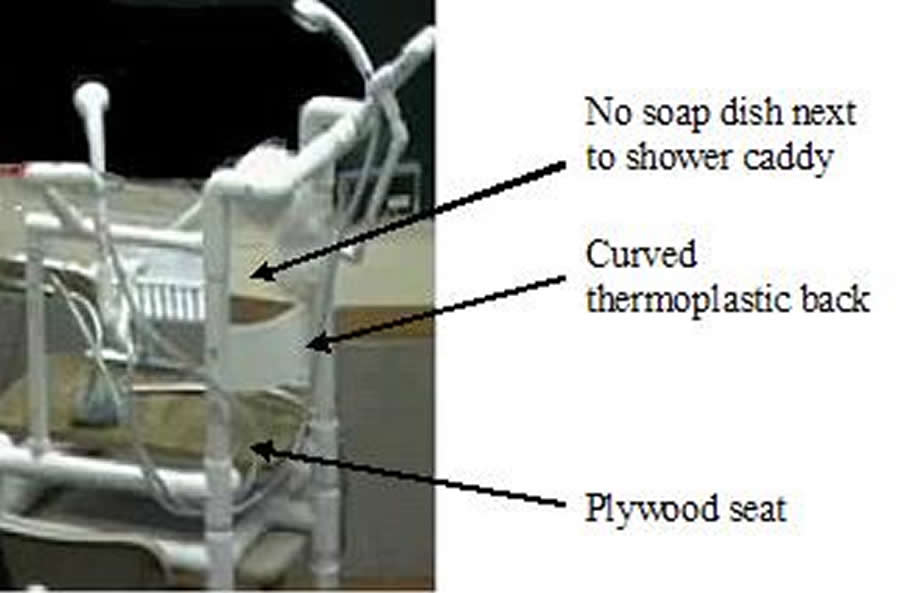 Photo 1: Chair Prototype (Click for larger view)
 Our client is an eight-year-old boy who has Thrombocytopenia, Absent Radius syndrome, or TAR syndrome. TAR syndrome is a rare genetic disorder characterized by low platelet levels in the blood and the absence of radii. The ulna and humerus are also sometimes absent or poorly developed (1). As a result, our client’s arms are short and weak. His thumbs also have a limited range of motion, so he has difficulty grasping most items. In addition, his legs, though very strong, have a limited range of motion.
The physical disabilities of our client sometimes make it difficult or impossible for him to perform certain actions independently. One such task that he has struggled with is bathing, as he is unable to reach many parts of his body (top of his head, stomach, back, backside). In addition, he cannot apply sufficient strength to clean many of the areas that he can reach. As a result, our client has needed his parents’ help to bathe, but he would like to be able to bathe himself. To do this, he needs a chair that will give him stability and safety while washing, while allowing him to reach and clean all parts of his body.
Many bath chairs are commercially available, but due to the rarity of our client’s disability, none of these chairs meet his specific needs.
PROBLEM STATEMENT
This project’s goal was to design and develop a chair that allows our client to clean all areas of his body easily, comfortably, safely and independently
DESIGN AND DEVELOPMENT
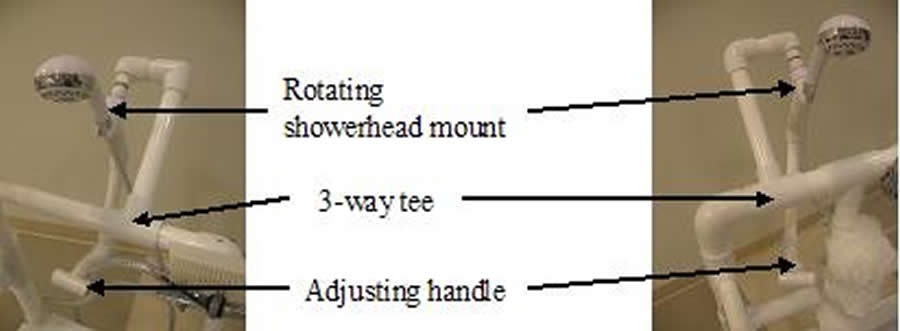 Photo 3: (a) Top showerhead attachment (b) Side showerhead attachment (Click for larger view)
 We designed the Bath Chair to cater to our client’s strengths. He has a limited range of motion in one of his legs and both of his thumbs, and also has short, weak arms. However, he has strong legs and is very flexible around the hips. As a result, we designed the chair so that he cleans himself mainly by rubbing against mesh bath sponges that are attached to the chair, thereby minimizing the use of his hands.
Our preliminary design (Photo 1), used for client testing, was very similar to the final product, but used plumbing-grade PVC pipe for the frame and plywood for the seat.
 Photo 4: Diverter (Click for larger view)
 At one of the first meetings with our client, we discovered that he could rub his back more effectively against a curved surface than against a flat one. As a result, our prototype had a thermoplastic curved back with a washcloth attached to it. However, this did not work as we had hoped, and we found that our client preferred rubbing against bath sponges mounted directly onto the back of the chair.
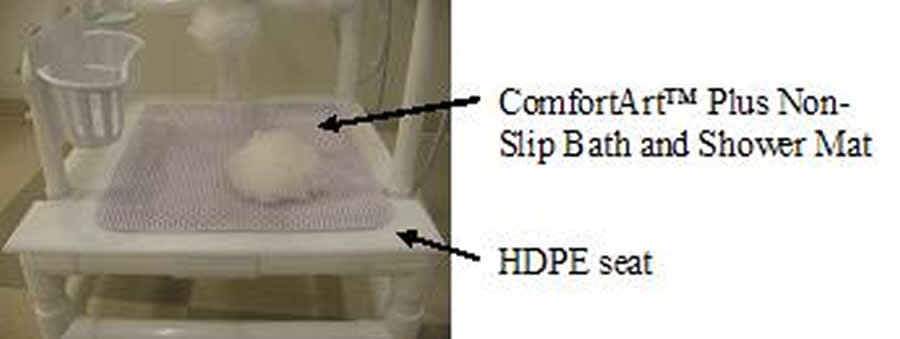 Photo 5 Here: HDPE seat with non-slip mat (Click for larger view)
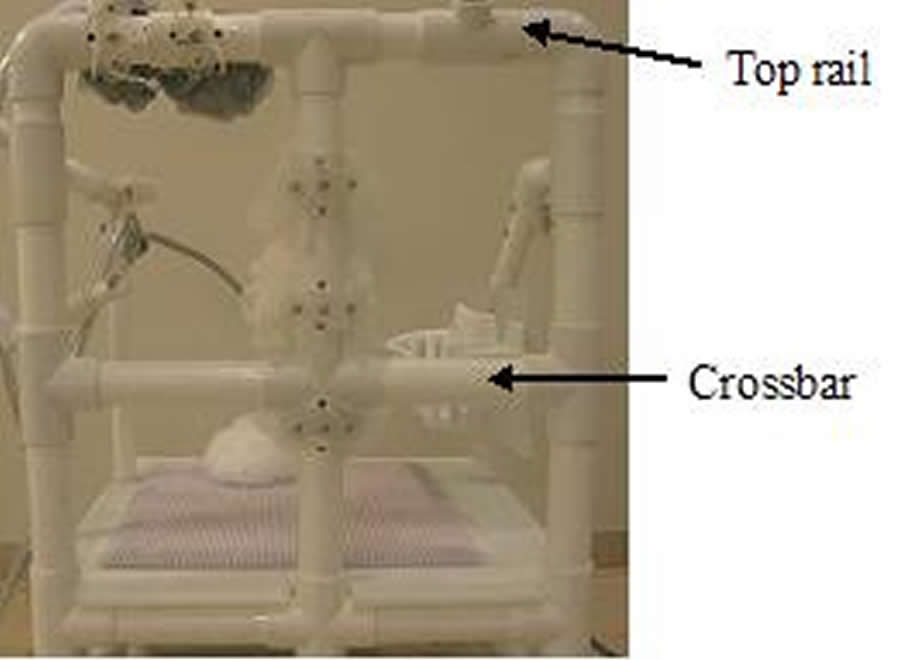
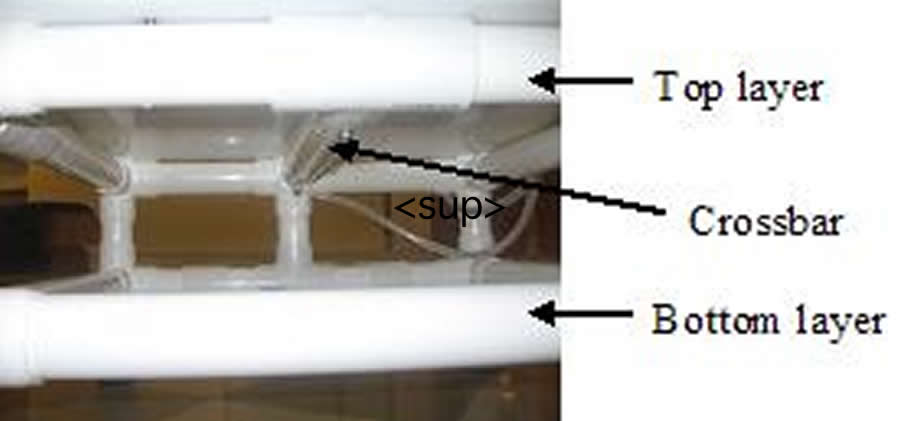
 After testing the prototype, we slightly changed the design of the frame to accommodate a flat back. The back of the frame (Photo 2a) now consists of three vertical bars that are connected by the top rail and a crossbar. The latter prevents our client from falling out the back of the chair if he should slip. The frame of the chair is made from 1.5” furniture-grade PVC pipe. The base (Photo 2b) is rectangular and has two layers. The bottom layer is for structural support, and the top layer, which contains an extra horizontal crossbar, is where the seat rests. The chair has safety rails on each side of the seat (Photo 2c), made from 1” PVC pipe, since this thickness is easier for our client to grasp. The safety railings are at a height such that our client can easily grab onto them if necessary.
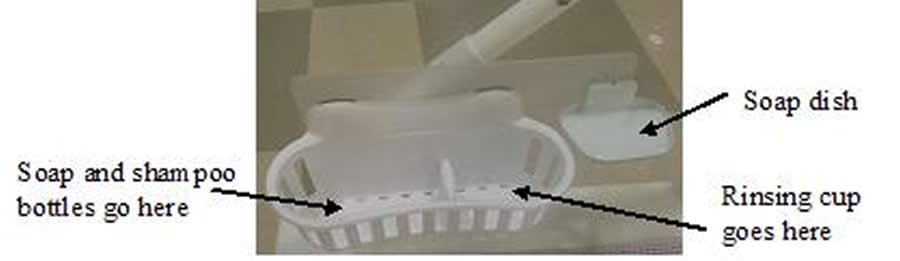 Photo 6 Here: Shower caddy and soap dish (Click for larger view)
 Two showerheads are mounted to the frame of the chair, one at the top of the seat back and one on the left safety railing (Photo 3). A hose is attached to the tub faucet via a threaded fitting. This hose is connected to a diverter (Photo 4), to which hoses for each of the two showerheads are attached. Each showerhead is attached to the frame with 1” PVC pipe and is mounted on a rotating showerhead mount. A handle made from 0.75” PVC pipe is attached to the rotating mount. The end of each handle is a ½” 3-way PVC tee which our client can grasp to control the direction of water flow. The diverter also has an on/off switch for each branch, which allows our client to control the water supply to each showerhead.
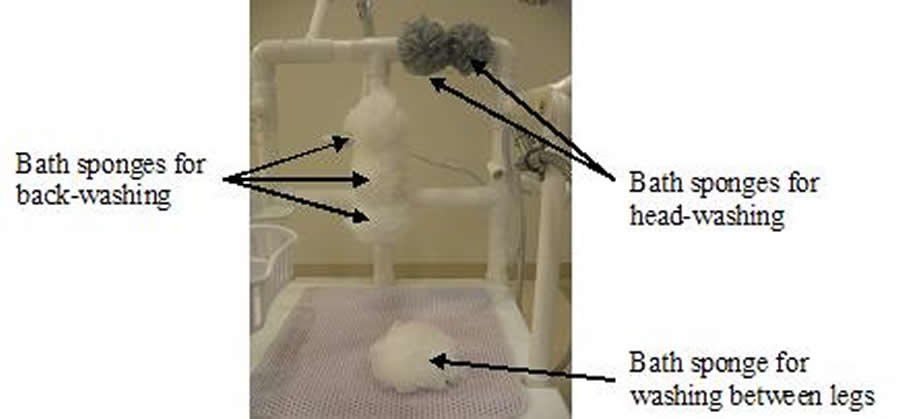 Photo 7: Bath sponges attached to the chair for washing (Click for larger view)
 The seat (Photo 5) is made from 0.5” thick High Density Polyethylene (HDPE), routed smooth on the edges. It rests on the base of the chair and is secured to the frame with machine screws. The top of the seat is covered with a ComfortArt™ Plus Non-Slip Bath and Shower Mat, by Griptex, which gives the seat a comfortable, non-slip surface. Small holes were drilled through the seat to prevent pooling of water.
An acrylic sheet is attached to the right safety railing to provide a convenient location for bathing accessories. A shower caddy (Photo 6), which holds soap, shampoo, and a cup that our client uses for rinsing, is mounted to the acrylic sheet, along with a soap dish. The soap dish allows our client to dispense soap only once, instead of having to pick up the bottle each time he needs more soap.
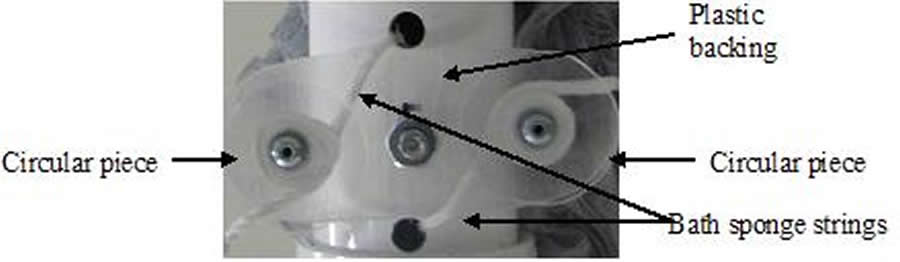 Photo 8: Envelope clasp attachment system (Click for larger view)
 We designed specific ways for our client to wash areas he couldn’t reach previously: his head, hands, stomach, back, backside, groin area, and upper legs. Bath sponges are attached to the frame of the chair in different places to allow our client to wash his head, back, backside, and groin area. We originally designed long-handled brushes, both straight and curved, for the client to use to wash his head, but these were either too heavy or too difficult to position properly. As a result, we attached two bath sponges to the top bar for our client’s head, along with three attached to the middle vertical bar on the back for our client’s back, and one attached to the seat for our client’s groin area and backside (Photo 7). Each bath sponge is attached to the frame of the chair using a separate attachment system. Each attachment system (Photo 8) consists of an ovular acrylic sheet that has two acrylic circles attached to one side using rivets. The result is similar to the clasp of a manila envelope and holds the bath sponge tightly. This system gives the bath sponges the dual properties of being very secure while being easy to replace.
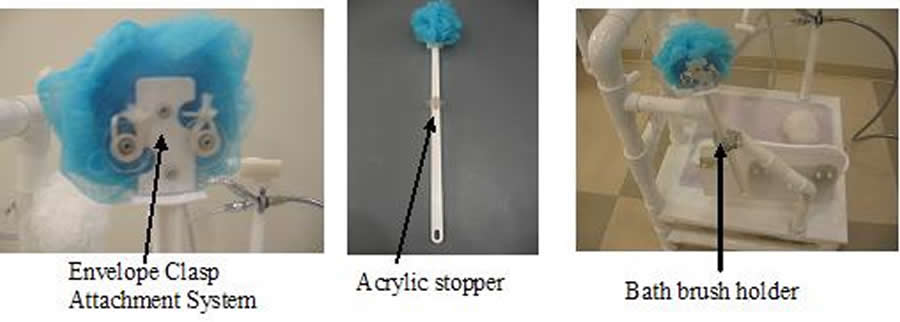
Our client will wash his stomach and the tops of his legs with a long-handled bath brush (Photo 9). It consists of the handle from a 22.5” Sammons Preston Rolyan® Long Scrub Brush with a bath sponge attached to the end (secured using our attachment system). An acrylic stopper is mounted to the handle to allow our client to grasp the brush without his hand slipping. The brush is stored in a holster on the right safety rail. A finger scrub brush (Photo 10) is also mounted to the left safety railing, just above the diverter, to allow our client to wash his fingertips.
EVALUATION
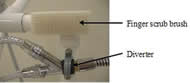 Photo 10: Finger Scrub Brush (Click for larger view)
 We discussed all ideas amongst ourselves and with our client and his mother before any building began. A significant amount of time was spent in this stage. We then built prototypes, and our client tested them while wearing a bathing suit in his bathtub. Adjustments were made based on our client’s feedback and the prototypes were re-evaluated, until the client was happy with that component of the device. This strategy allowed us to build a device that our client enjoys and will be able to use effectively.
DISCUSSION AND CONCLUSIONS
A major advantage of the Bath Chair is that it has few moving parts, and these parts are very simple. This makes the chair both easier to use and more likely to last for a long time. In addition, our client has complete control over the water flow. He can use the push-button valves to turn either showerhead on or off, and he can reach the faucet knobs with his feet to adjust the temperature of the water while safely seated in the chair.
The one significant limitation of our chair is that the height of the chair is not easily adjustable. This was unavoidable because the locations of components such as the bath sponges and safety railings forced a certain structure for the PVC pipe and fittings. However, the client’s father can remove and replace the top rail of the frame and add longer pieces of pipe to make it higher when necessary.
REFERENCE
- Greenhalgh et al. “Thrombocytopenia-absent radius syndrome: A Clinical Genetic Study.” Journal of Medical Genetics. 2002(39): 876-881.
ACKNOWLEDGMENTS
This project is supported by the National Science Foundation under Grant No. BES-0610534. We would like to thank our professor, Dr. Laurence Bohs, for guiding the project design and development, and Gabriel Howles, for helping machine parts and giving great input on the design of the device.
Primary Author: Robert Buechler, 18 Alberta Drive, Marlboro, NJ 07746
APPENDIX A: SUMMARY OF IMPACT
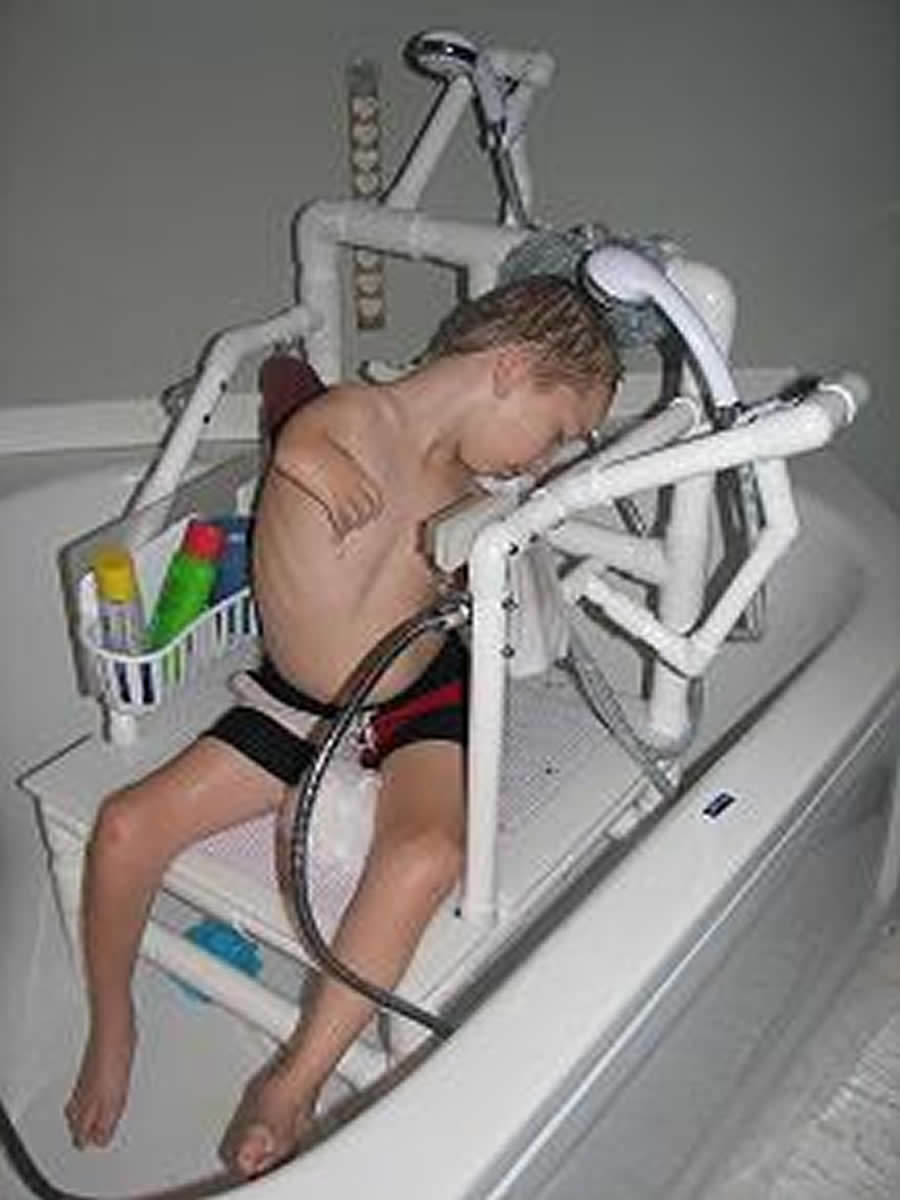 Photo A1: Client Washing Head (Click for larger view)
 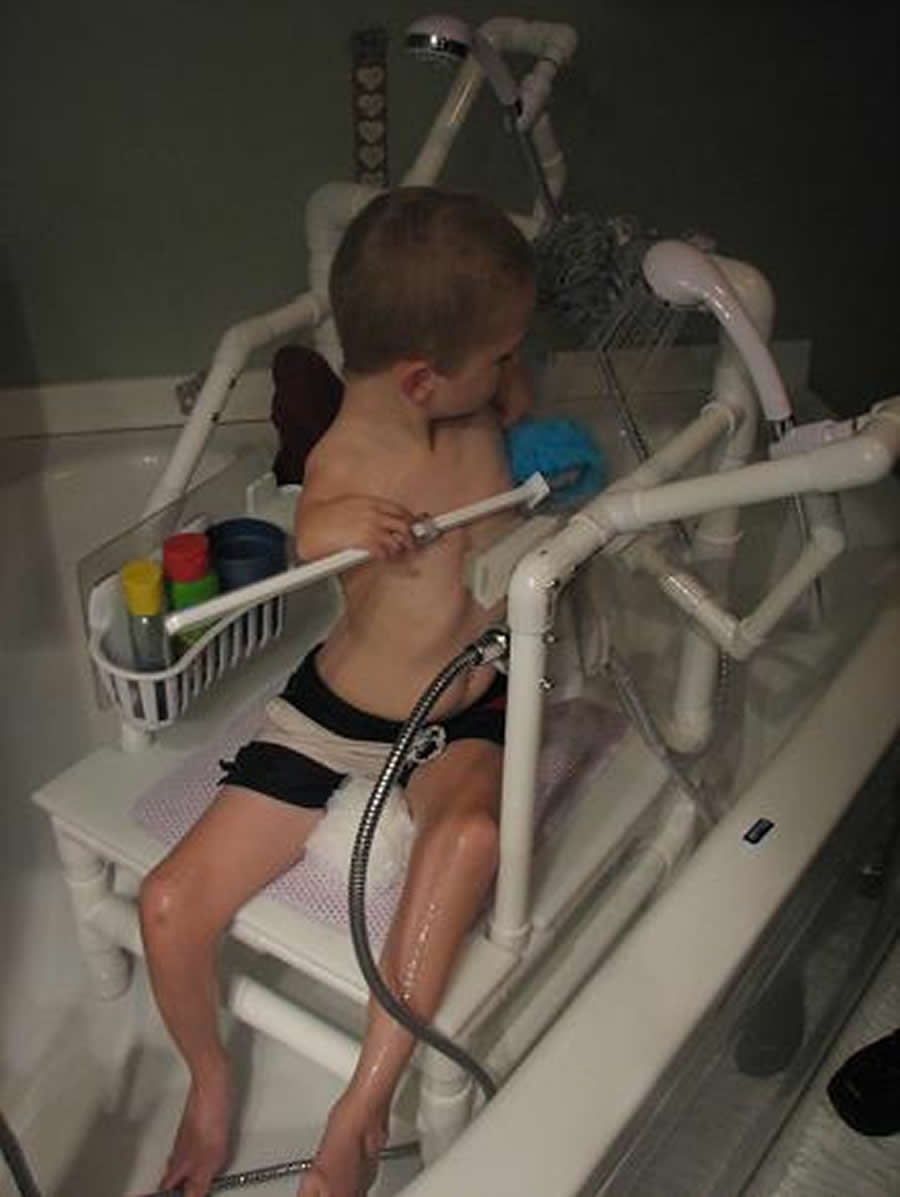 Photo A2: Client Using Bath Brush (Click for larger view)
 This bath chair will have an immediate impact on our client’s life. He has been trying to bathe on his own for six years without success, so using this chair to bathe independently should provide him with a huge confidence boost. The significance of this device can be seen in the reactions of both our client and his mother; as his mother says, “This is a huge step in terms of personal care for himself. He is so excited about getting it that he is counting the days to final delivery… I can't put into words the joy it makes me feel seeing him excited about gaining this independence.” Photo A1 and A2 show the final product in use.
APPENDIX B: MECHANICAL DRAWINGS AND ELECTRICAL SCHEMATICS

Figure B1: Lower Layer of Base
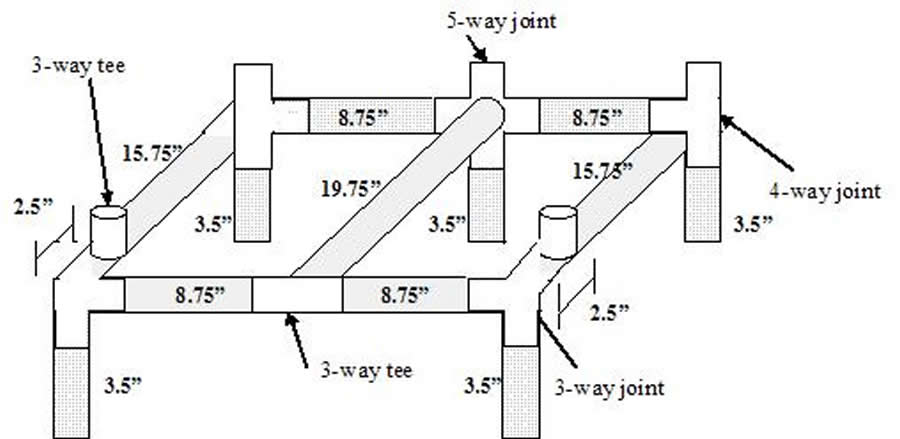
Figure B2: Top Layer of Base
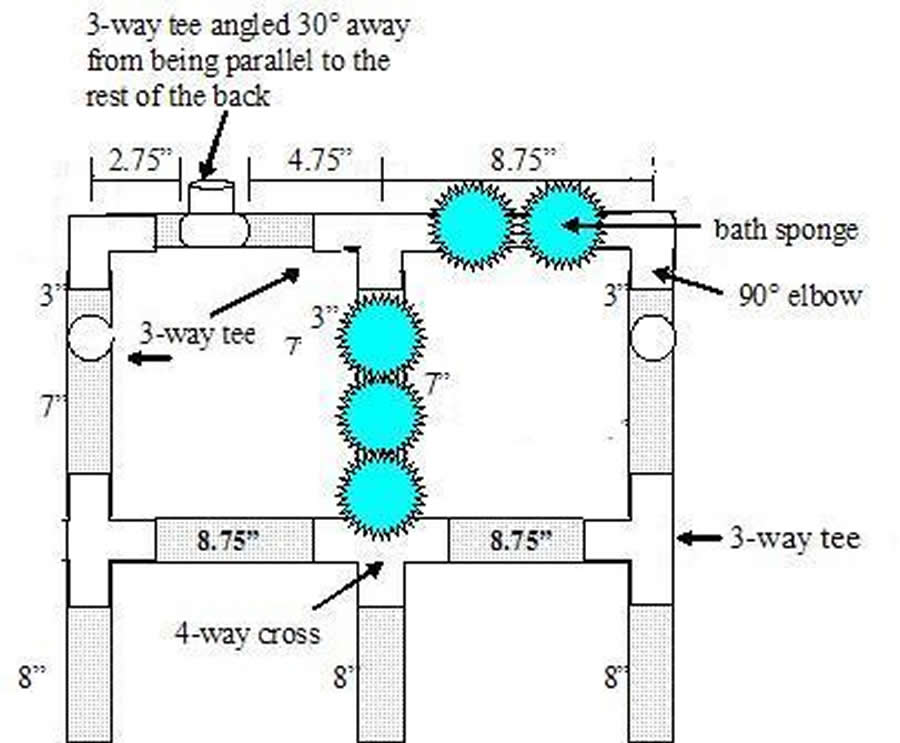
Figure B3: Schematic of Back, Front View
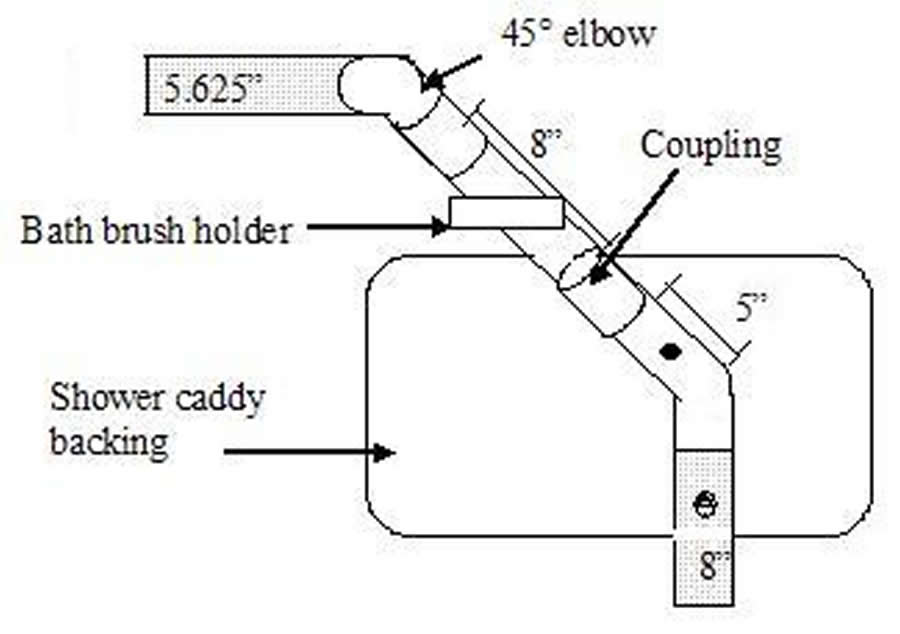
Figure B4: Right Safety Railing
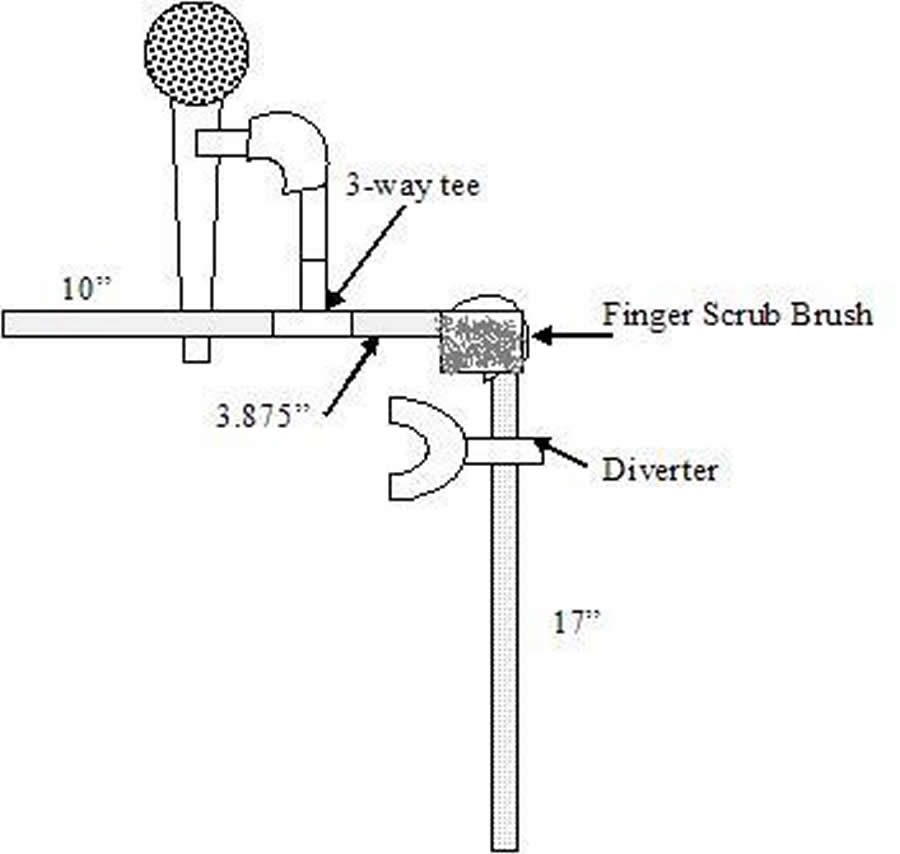
Figure B5: Left Safety Railing
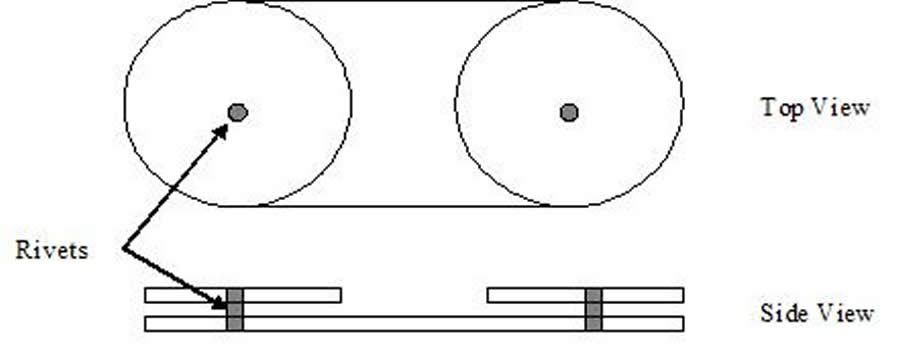
Figure B6: Schematic for Envelope Attachment System
APPENDIX C: HAZARD ANALYSIS
Likelihood of Occurrence: Frequent, Probable, Occasional, Remote, Improbable, Incredible
Severity of Consequence: Catastrophic, Critical, Marginal, Negligible
Risk Assessment: Intolerable Risk, Undesirable Risk, Tolerable Risk, Negligible Risk
| Potential Hazard | Likelihood | Severity of Consequence | Risk Assessment | Plan |
|---|---|---|---|---|
| Falling off of chair | Remote | Marginal | Tolerable | Safety railings, textured seat. |
| Slipping while on chair | Occasional | Marginal | Tolerable | Safety railings, non-slip pad on seat, no sharp edges, cap nuts on all exposed screws. |
| Chair tipping over | Improbable | Critical | Tolerable | Chair is heavy and has a low center of gravity. |
| Water or soap in eyes | Probable | Negligible | Tolerable | Attach hook to frame to hold a dry washcloth for drying eyes. |
| Burning from hot water | Remote | Marginal | Tolerable | Heat limiter already in place to restrict water temperature. |
| Chair collapsing | Improbable | Critical | Tolerable | Pipes are connected with PVC cement, which permanently bonds the frame. |
| Hitting chair attachments | Probable | Negligible | Tolerable | Attachments are placed along the chair frame and are out of the way. |
| Chair slipping | Remote | Negligible | Negligible | Rubber on feet of chair, combined with weight of chair, should prevent slipping. |
| HDPE breaking | Improbable | Marginal | Negligible | HDPE is very strong and meant to last for a long time; crossbar underneath seat adds support. |
| Attachments breaking | Remote | Negligible | Negligible | Attachments are securely connected to chair frame with bolts, rather than adhesives. |
| Drowning | Incredible | Critical | Negligible | Tub drain should always be open so water should never accumulate at the bottom of the tub. |