Diabetes Management for the Disabled: Assistive Device for Patients with One Functioning Arm
Eileen Hayden, Ross Budacki, Kim Kontson, Melissa Ong, Andrew Richart, Amanda Scott
Department of Bioengineering, The Pennsylvania State University
ABSTRACT
Managing diabetes requires a patient to provide a blood sample for determining glucose levels and be able to withdraw and inject the correct dosage of insulin. These tasks are a burden for all diabetics, but when the patient only has one functioning arm, this process becomes even more complex. The goal of this project is to describe a feasible and innovative design idea for a portable device that will assist disabled patients in better managing their diabetes. In order to address the most challenging step in diabetes management, the scope of our design focused on the accurate and efficient withdrawal of insulin using only one hand. In addition, this design incorporates a component to aid the patient in piercing their finger to obtain a blood sample for glucose monitoring. Testing included a product evaluation survey to determine the ease and practicality of the design.
Keywords:
Diabetes, Insulin Withdraw, Glucose, Assistive Device
BACKGROUND
Diabetes is a disease which affects 7% of the United States population(1). It is the leading cause of blindness, kidney failure, amputations, cardiovascular disease and stroke(2). About 60-70% of people with diabetes have mild to severe forms of nervous system damage, including impaired sensation or pain in the hands or feet, carpel tunnel syndrome, and other nerve problems(3). These impairments are highly correlated to the loss of arm function in patients. The goal of the device is to help the patients provide a blood sample for a glucose test meter and to accurately withdraw insulin with one arm. Patients currently have an assistant to help them with these tasks; however, it is important for the patients to be able to independently complete these tasks. Although a great amount of work has been dedicated to developing assistive devices for diabetic patients, a specific device catered towards a disabled patient with only one functioning arm was not found in our research. This stresses the need for the development of an innovative assistive device for disabled patients.
Objectives
Diabetes Management Design (DMD) provided multiple designs, resulting in a final prototype to address the issue of aiding insulin withdrawal and monitoring glucose levels for a patient that has use of only one arm. DMD set three general design objectives to meet during this design process:
- To create a device to fit standard insulin vials as well as a 3/10 cc, a 1/2 cc, or a 1 cc, insulin syringe for use with one hand
- To use the device for filling the syringe with insulin with the accurate dosage
- To create an aid for the process of testing blood sugar levels with a glucose test meter as well as obtaining a blood sample from different areas of all fingers
Glucose testing is a very important part of diabetes. Keeping glucose levels under control will avoid other complications. By creating a diabetic aid for people with one arm, the patient will be able to test their blood sugar more easily. All objectives must be portable, small enough to fit in a glucose kit and reusable for the patient.
DESIGN SELECTION
In order to fully understand the project, a one-handed simulation was performed by the members of DMD using a standard insulin kit. Our findings revealed two major steps that were challenging to perform safely with only one hand. The first step, which takes place during the glucose testing process, is removing the plastic cap from the lancet and ejecting the lancet device into an accurate point on the patient’s finger. Removing the lancet cap requires a twisting motion that typically would be done with two hands. Ejecting the lancet device into an accurate point on the patient’s finger led to using unsafe techniques of holding the lancet device, such as using the legs as a clamp. The second and most significant difficulty is the process of withdrawing insulin from the vial. The vial must be held in an upside down orientation while the syringe plunger is pulled back. Furthermore, the air bubbles are removed by tapping on the syringe barrel and pushing the plunger slightly in. With only the use of one hand, we found it necessary to resort to alternative methods including unsafe techniques. Based on the findings from the simulation we conducted, several designs were created.
 Figure 1: First design proposal with roller (Click for larger view)
 The first design is for a device that holds the insulin vial and syringe and allows the plunger to be moved by a thumb roller. The roller allows the patient to move the plunger to increase or decrease their desired dosage. The entire device can be held comfortably in one hand. A sketch of this design is shown in figure 1.
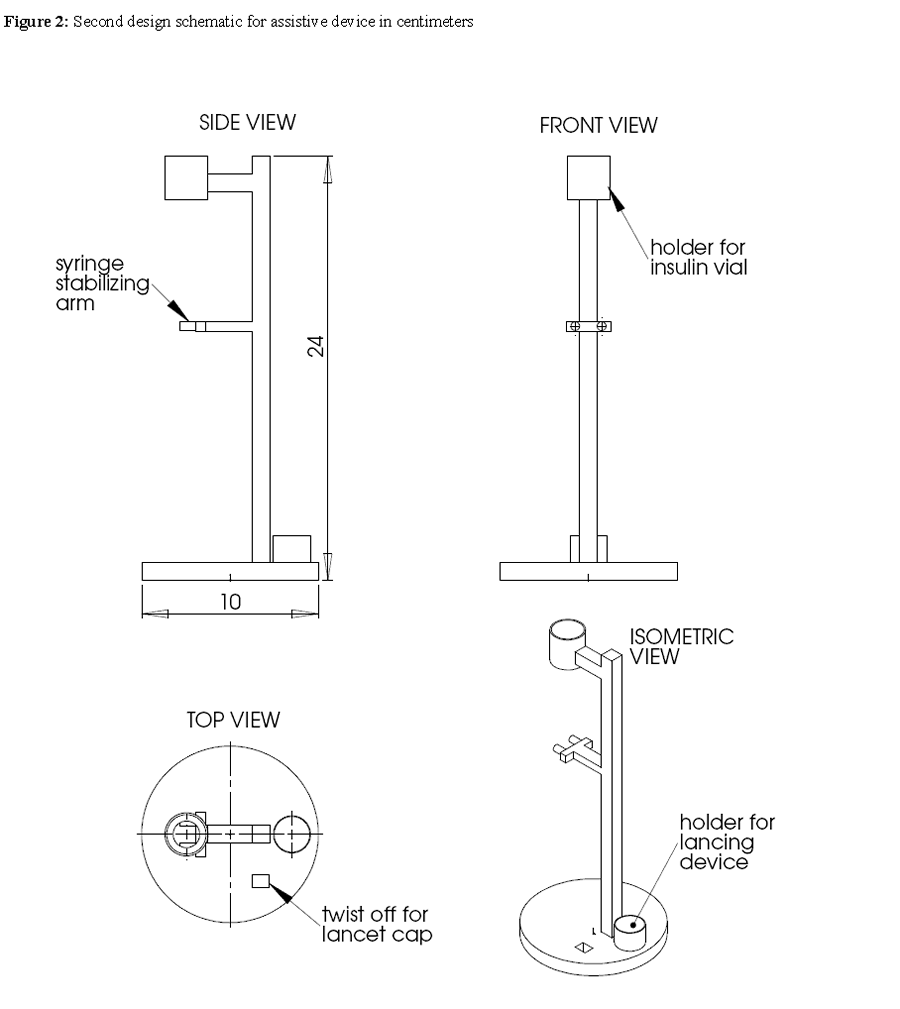 Figure 2: Second design schematic for assistive device in centimeters (Click for larger view)
 The second design is for a device that suspends the vial and syringe off of the countertop to allow the patient to freely move the plunger. The base of this design incorporates a lancet cap remover and lancing device holder to assist in the pricking process of the glucose testing phase. While the syringe is in suspension, there is a clamp that holds the barrel of the syringe in a fixed position, allowing the patient to move the plunger to adjust the dosage without removing the syringe from the vial. A sketch of this design is shown in figure 2.
 Figure 3: SolidWorks design of the column. (Click for larger view)
 The third design is similar to the second design but contains several distinct differences. Rather than having the vial and syringe suspended from a cantilevered arm, the vial holder is located in the center of the device. Instead of using a clamping device to secure the barrel of the syringe, ridges are incorporated to allow for the syringe base to turn and lock in. The upper portion of this device is contained in a cylindrical tube with openings that allow for the patient to adjust the syringe placement to lock into the ridges. Once the syringe is locked into place, the patient can maneuver the plunger to the desired dosage. This device is machined in two pieces, allowing for portability. The upper portion has two tabs that allow it to twist and lock into the base. The base contains a similar lancet device holder and a lancet cap remover for the patient to twist off the cap. A sketch of this design is shown in figure 3(column) and 5(base).
Selection Criteria and Design Selection Process
| Criterion | Weight |
Description |
|---|---|---|
Functionality |
3 |
The device must facilitate one handed insulin withdrawal and lancet preparation. This is essential for the success of our product. |
Cost |
2 |
The final retail cost of the product must be less than $100. Patients have many added expenditures necessary to manage their diabetes, so our product cannot be too expensive for them to afford. |
Weight |
2 |
The device must weigh less than 2 lbs. The patients that will be using this device will only have one functioning arm, so it is important that our product is not too heavy for them to move around. |
Portability |
3 |
The device must be easily carried along with the patients so they may use it wherever they may be. |
Adaptability |
2 |
There is a wide variety of syringes and lancing devices available on the market. It is important that our product is able to work with a variety of these products. |
Aesthetics |
1 |
As with any product manufactured, visual aesthetics are desirable to promote sales and use of the product. |
Ease of Use |
3 |
Given the disabilities of our target customers, it is essential that the device is simple and easy to use. This entails the fewest moving parts as possible. |
Manufacturability |
3 |
The product must be able to be manufactured from the designs shown in section 3.1. Complex assemblies and intricate parts require advanced machining that may not be practical for our product. |
Safety |
3 |
The product must be safe for use by the patient, moreover, must prevent any accidental sharps sticks. |
Reusability |
2 |
The product must be designed for continuous use. The patient may need to use the device several times each day, and it should maintain functionality for at least 3 years. |
In order to evaluate the three different design concepts, it was necessary to decide on a set of selection criteria by which they would be judged. The criteria include both production and usability factors. A list of all of the selection criteria and their descriptions is found in table 1. In addition, each criterion is given a weighted value to indicate how important it is for the design evaluation process on a scale of 1 to 3. A 1 indicates that it is a desired trait, but that the design may still be acceptable if it does not completely address that need. A 3 indicates that a particular trait is crucial for our final product, and thus carries more weight in the final decision. Once the criteria were decided, each design had to be individually evaluated based on those factors. The ratings were tallied in our selection matrix, table 2, and a weighted score for each attribute was calculated based on the formula:
weighted score = (criterion weighting) X (design rating)
|
|
Design 1 | Design 2 | Design 3 | Rating Justification |
|---|---|---|---|---|
Functionality (3) |
2 (6) |
3 (9) |
3 (9) |
While 2 and 3 aid in insulin withdrawal and glucose testing, 1 has no lancet capabilities. |
Cost (2) |
2 (4) |
3 (6) |
3 (6) |
The cost of acrylic for 2 and 3 is $0.28 per in3 while the cost of ABS thermoplastic for 1 is $8 per in3. |
Weight (3) |
3 (9) |
2 (6) |
2 (6) |
1 is constructed of lightweight ABS (.038 lb per in3). 2 and 3 are made of acrylic (.043 lb per in3), but require extra weight for the base to be stable. |
Portability (2) |
3 (6) |
1 (2) |
2 (4) |
The small design of 1 makes it the most portable. While 2 and 3 have similarly bulky designs, the two piece design of 3 makes it fairly portable. |
Adaptability (1) |
2 (2) |
3 (3) |
3 (3) |
2 and 3 are designed to handle syringes of various sizes, while 1 can only fit one type. |
Aesthetics (1) |
2 (2) |
2 (2) |
3 (3) |
The round geometry of 3 gives it a more finished look compared to the sharp edges of 2. |
Ease of Use (3) |
2 (6) |
2 (6) |
3 (9) |
With no moving parts, design 3 is the easiest to use. 1 and 2 require movements that may be difficult for the disabled. |
Manufacturability (3) |
2 (6) |
2 (6) |
3 (9) |
Design 1 is an assembly of smaller parts that would need to be rapid prototyped. The clamping mechanism of 2 is difficult to build. Design 3 is easily machined using the lathe, mill, and laser cutter. |
Safety (3) |
3 (9) |
2 (6) |
3 (9) |
Designs 1 and 3 contain the needle while it is inserted in the vial, to ensure the users cannot prick themselves. Design 2, however, leaves the needle exposed. |
Reusability (2) |
3 (6) |
3 (6) |
3 (6) |
All designs are intended for extended lifetime use. |
Total Score |
56 |
52 |
64 |
This provided weighted scores shown in parenthesis ranging from 1 to 9, the sum of which was the total score for each design. By using a rating system, the total score takes into consideration the significance of the criteria as well as the ability of the design to meet that need. Design 3 was pursued for our final prototype.
DETAILED DESIGN
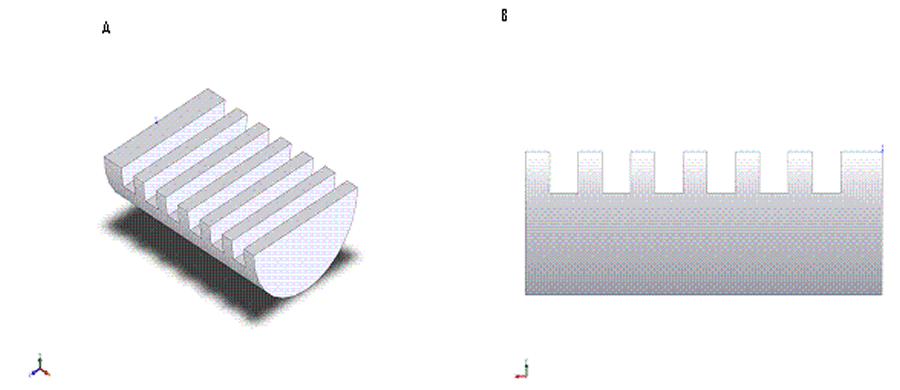 Figure 4: (A) Isoparametric view of the column notches. (B) Side view of the column notches. (Click for larger view)
 Plexiglass was chosen as our material because it is durable, cost efficient, and easily machinable. The two main components of the design are the base and column. The base was designed as a two-dimensional drawing in SolidWorks, which can be seen in figure 5. The pieces were cut using an M-360 Laser Platform and screwed together. The column was initially a hollow cylinder, with an outer diameter of 1.73 inches. Using the mill, the cylinder was cut in half in the appropriate areas, leaving the top and bottom as full cylinders as seen in figure 3. The vial holder and transition piece for the keyhole attachment were made on the lathe. The column notches in figure 4 were designed to fit the flanges of typical syringes used by diabetic patients.
 Figure 5: (A) Dimensioned view of the top layer of the base including the lancing device cut-out, lancet notch, and keyhole stability. (B) Dimensioned view of the middle layer of the base including lancing device cut-out, lancet notch, and track for keyhole stability. (C) Dimensioned view of the bottom layer of base including the lancet notch. (Click for larger view)
 For our targeted consumers, the process of glucose testing and insulin withdrawal is going to be second nature. The operation of our device keeps these processes similar to what the patient is used to. As the patient goes to check their glucose levels, they are able to pull out testing strips, place them on the glucose monitor, and clean the appropriate area of the finger. To assemble the device, the top rod portion will fit into keyholes on the base. The top rod will twist in the keyhole, providing stability to the entire device. The next steps in the process will use our assistive device:
- The patient will place the lancing device in the designated cut-out on the base of our device.
- The patient will place the tip of the lancet in the lancet notch on the base of the device, and twist to release the lancet cap. The cap falls through the device and can easily be picked up for disposal.
- Place the uncapped lancet in the lancing device, recap the lancing device and prime the device for piercing. The patient is able to pierce different fingers in different areas.
The patient would need to follow steps for safe and accurate insulin withdrawal with one hand.
- The patient will remove the cap of the syringe, pull out the plunger to the dosage level, and insert the needle of the syringe in the insulin vial.
- The patient will inject the air into the vial, pick up the vial and invert it with the syringe attached.
- The syringe and vial will be dropped through a key hole in the top of the device. The vial will fit firmly in the top and the syringe will be allowed to pass through.
- To secure the syringe during withdrawal, the flange of the plunger will be fitted in notches on the rod. The patient is able to move the plunger as needed to get the correct dosage.
- The syringe can be pulled out of the device and injected..
| Item | Price |
|---|---|
Acrylic base plastic |
$3.50 |
Hollow Acrylic Tube |
$19.86 |
Solid Acrylic Tube |
$23.66 |
Screws |
$0.09 |
Epoxy |
$0.50 |
Labor |
$ 30 ($10.00 per hour approx. 3) |
TOTAL |
$77.61 |
In order to produce a high quality product the following cost will be associated with the production of our device in table 3. According to this cost analysis the majority of the expense in production of our product originates from labor costs. This is a cost estimate for single production. With mass production labor costs could potentially decrease by three-fold or even more. Additionally, with the purchase of bulk materials costs would also drop dramatically.
RESULTS AND CONCLUSION
A survey was conducted for the evaluation of the product. Subjects were asked to remove the lancet cap and withdraw insulin with one hand. Then they were asked to repeat the process with the assistive device. Twenty people participated in the survey and 25% of the subjects were familiar with how to use a syringe and had prior experience with glucose monitoring. The following are the results of the survey:
Point values were assigned for statistical analysis: 1 = Very Difficult, 2 = Difficult, 3 = Moderate, 4 = Easy and 5 = Very Easy. Using all the variables, without the device received a rating of 1.6 ± 0.465 and with the device received a rating of 4.5 ± 0.45. This result shows that there was a 58% overall increase in the ease of diabetes management.
Overall, the design specifications were met. The design was helpful in assisting the removal of the lancet cap, stabilizing the syringe, being able to withdraw an accurate dose, and removing the syringe from the vial to inject the insulin. However, the notch for the lancet cap has shown some difficulty with the device. This is a task to reevaluate for future designs.
The overall design of the device has been proven to be very effective. Though there are always continuous improvements to be made for the device, the final prototype provides diabetic patients with one functioning arm a way to easily remove lancet caps, position their finger at the desired test site, and withdraw accurate dosages of insulin with no air bubbles. The team of DMD has worked efficiently to present the simple and portable device for diabetic patients. Future improvements will be made to the device to enhance portability.
REFERENCES
- "All About Diabetes." Diabetes Information. American Diabetes Association. 10 Feb. 2008 <http://www.diabetes.org/about-diabetes.jsp>.
- Penn State Institute for Diabetes and Obesity. 27 Mar. 2008. Penn State Milton S. Hershey Medical Center. 12 Apr. 2008 <http://www.hmc.psu.edu/diabetes/index.html>.
- National Diabetes Fact Sheet. Department of Health and Human Services. Phoenix: CDC Division of Diabetes Translation Public Publications, 2005. 6.
Author Information
Eileen Hayden
501 Vairo Blvd Apt 711
State College PA, 16803
609-313-4606
emh5010@psu.edu